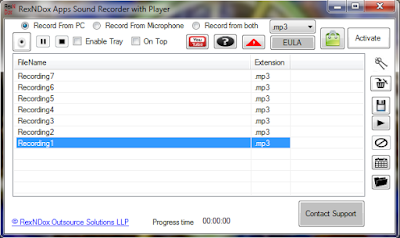
Today, we will see how to record streaming audio on Windows. The recorded audio can then be saved in .mp3 or .wav formats and played in any kind of device, including your PC, tablets and mobile phones. We will be using the software RexNDox Apps Sound Recorder with Player.
So, let’s get started.
Instructional Video
So, let’s get started.
Instructional Video
STEP 1. GETTING RexNDox Apps Sound Recorder with Player
You can download the setup file for the audio recorder here. You will download the demo version, which will be able to record the 3 minutes. You can buy the full version by clicking on the green icon at the top right of the application. Once you get the license key, you can see the full version by just clicking on the Activate button.
STEP 2. STARTING THE APPLICATION
Now that you have installed the application it’s time to put it into work. For this, find the quick launch icon of the application on the desktop (a microphone type icon) and then double-click on it to launch the application.
STEP 3. GETTING THE APPLICATION TO RECORD THE STREAMING AUDIO PLAYING ON THE COMPUTER
Now, to record streaming audio from the computer, follow the below steps .
- Getting the podcast ready – Select a podcast and make it ready for playing.
- Getting the sound recorder ready – To record the sound playing on computer, select the Record From PC, which is present at the top-left corner of the application’s window by clicking on it.
- Play the podcast – Now start playing the audio.
- Navigating within the application
- Click the Start Recording button to start your recording. You can also schedule your recording if your recordings are time specific or you don’t want to record the sound manually. You can do this by clicking on the Scheduler button on the right side of the application’s window.
- Click the pause/resume button to pause or resume your recording.
- Click the stop button to stop your recording.
- After stopping the recording, your recording appears in the FileName tab from which you can select and play the audio by clicking the play button on the right side and stop by clicking the stop button.
- You can save the recorded file in the desired format or delete it by selecting the corresponding file from the FileName column and clicking on the save button or delete button respectively.
STEP 4: ACCESSING THE RECORDED FILE FOR FUTURE USAGE
You can access your recording directly through the application by clicking on the Open Recordings Folder tab.
Notes:
- This application works only on windows 7 and above
- Speakers or headphones aren’t required as only audio playback is required for the app to work
- Make sure that audio drivers are properly installed in the system
- The application enables stereo mix by itself.
Well, that’s it guys. Hope this tutorial helped you record a podcast playing on the computer to mp3. Comments are welcome and please don’t forget to share.


Leave a Reply